
These instruction describe how to install or update Quickmap version 8 software by downloading the software install from the internet.
There are a 2 types of install in Quickmap Version 8:
- Standalone installation, in which, both software and data are installed on the same machine (this is the same as a client with it’s data stored locally)
- Client-Server installation, in which the data is installed on a server (such as a NAS, SAN, or computer hosting a network drive), and the software is installed on a different machine(s)
Both of the above options are valid for terminal servers.
This article covers the Client-Server installation, see this article for information on how to install Quickmap in a Standalone configuration.
How To Install Quickmap V8 As A Client-Server Installation
The first step is to install both the software and data onto the server (recommended). The software does not need to be run or registered after installation (and will therefore not require a license), the software installation is only required to copy the software installer to the data directory so it can be run later to install client machines (the benefit being that the client install will automatically specify the correct data directory location). If you do not want to install the software on the server, then you can use the Data Only option for the Server install, then specify the location of the data on the client during the client install. Additionally, the client installation may also be aware of the data directory on the server (from previous registry settings) if you have already installed Quickmap on that client computer at some point.
Server Installation
To install Quickmap on the server, after you have clicked on the download link provided to you by Custom Software Limited, or pasted the URL into your web browser, a webpage similar to the screenshot below will be displayed. This screen will tell you what you are going to download, and how big the download is. ❗ If you have been given a zip download for the server installation (containing only the software files), the instructions for that are available here.
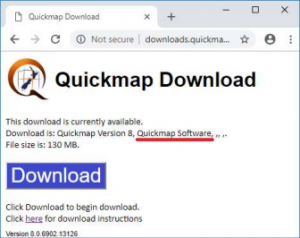
Click the Download button.
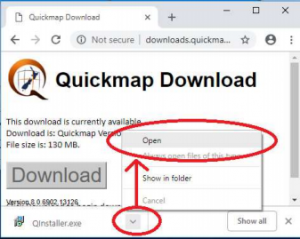
Run the download. ❗ Do NOT attempt to run QInstaller.exe as administrator (The software gathers essential information about the user’s drive mappings, and will elevate to Administrator later when required).
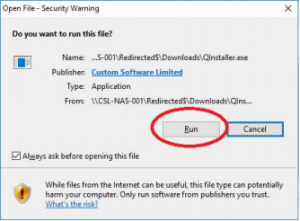
Click Run.
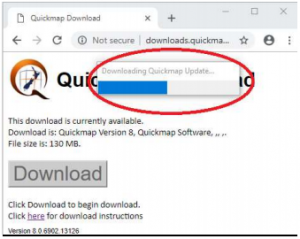
Wait for the download to finish. This should take around 2 minutes.
When the download has completed, you may be prompted to enter your administrator login credentials to begin the install of the download. Enter your administrator login and password if necessary. The first installer form will display. Click the Next button and follow through the prompts until you arrive at the Feature Selection page. On the Feature Selection page, choose Software and Data to install both on your machine (if you have a separate URL for data, you may only have the option for Software here, in which case, select Software Only). Continue to click through the prompts to complete the install, optionally changing the location of the data or software if you wish (you may not be able to change the location of the data, if data is already installed).
❗ Note: On some versions of windows, you may receive a message suggesting that the program may not have installed correctly. If this message appears, click This program installed correctly.
If you have been sent a URL for a Quickmap data download, and have not yet downloaded the data update, then paste the second URL into your web browser, and then follow the prompts, which will be similar to these instructions.
You will then need to share your data directory to the clients (such as through a network drive or UNC share). How to do this is beyond the scope of this article.
Client Installation
Once you have successfully installed Quickmap on the server, you can now install the Quickmap client on the workstations. To do this, on the client, navigate to the folder containing the data directory and run QSetup.exe, following the prompts (you can also do this using the silent installation options below, without having to specify the data directory). If QSetup.exe does not exist, you probably didn’t install the Software option on the server, and may either install the software on the server or use one of the following options:
- Perform a standalone installation on the client, specifying the Software Only option at the Feature Selection page
- Perform a silent installation on the client, specifying the data directory.
Quickmap Client Silent Installation
To do a silent install of Quickmap version 8 use the following command:
QSetup.exe -quiet -passive
or the following command if you need to specify the data directory (:!: Note that this will be overridden if there is already a registry location specified or if you are running qSetup.exe from a folder containing a valid data directory):
QSetup.exe -quiet -passive DataDir=C:\QDataOverride
(The QSetup.exe can be acquired from the data directory after installing the latest version on the server, or directly from this location: http://downloads.quickmap.co.nz/URLDownloadHost/downloads/Qmap_V8_zip).
There is also a configuration file available that overrides the above command. This can be used by creating a file called QuickmapSetup.config in the folder containing QSetup.exe, with the following contents:
<?xml version=”1.0″ encoding=”utf-8″ ?>
<configuration>
<appSettings>
<add key=”DataDir” value=”C:\QMapConfig\DataDir”/>
</appSettings>
</configuration>