When updating Quickmap with the latest data (such as Disk 2 North, South or NZ), you may get one of the following errors:
Permission denied
or
Failed to copy files E:\Data\*.* From: E:\Data\ To: G:\Qmap\Data\
These errors usually occur if you do not have permission to copy the files. This may be because the files are locked because someone is using them on your network, or it may be because you do not have permission to replace existing files. This can happen if your account is restricted, or you are upgrading to a network share which is read only.
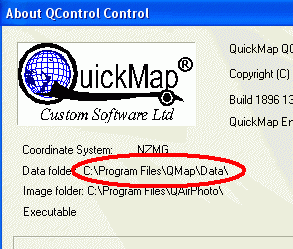
- The first step is to make sure that no-one is using quickmap on your network. To do this, find out the location of the QuickMap folder by running quickmap, and selecting Help -> About from the menu. The Data folder is displayed as shown below, which in this case is C:\Program Files\QMap\Data.
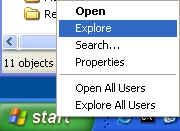
- When you have determined the location of the data folder, exit QuickMap then run explorer by right mouse clicking on the Start button and choosing Explore from the menu.
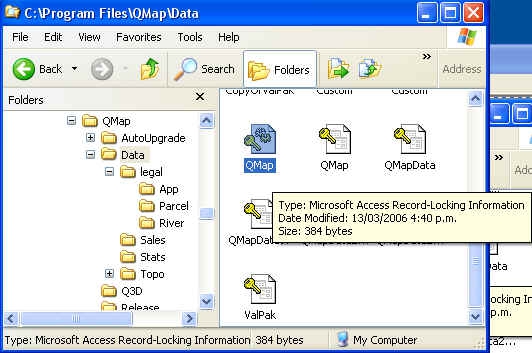
- Browse to the QuickMap folder using Explorer, and look for a file called QMap.LDB. If your version of Explorer hides file extensions, then QMap.LDB will be described as a Microsoft Access Record-Locking Information file. If you find a file called QMap.LDB, this normally means that someone is running QuickMap on your network, and is probably why the upgrade did not work. If you are sure no-one is running QuickMap, then you can delete the file manually.If the file cannot be deleted, you can reboot the PC and try again. If the file is on the server and you are browsing the file through a shared network drive, then you will need to reboot the server, not your local PC.After deleting the file, re-run the upgrade off Disk 2. If QMap.LDB did not exist in the first place, continue with step 4 below.
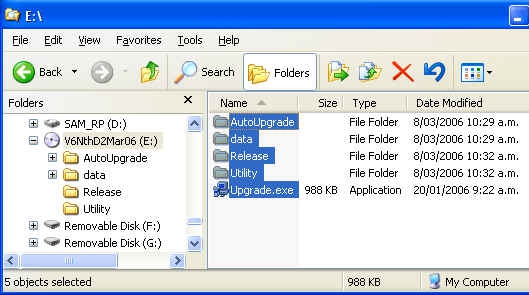
- Insert Disk 2 in your CD-ROM drive, Click on your CD-ROM icon in the left hand pane. Highlight all files by clicking Edit -> Select All from the menu, then copy the highlighted files and folders by clicking Edit -> Copy from the menu.
- Browse to the QuickMap folder using Explorer. The quickmap folder is the same as the QuickMap Data folder minus folder Data. e.g. If Help -> About in QuickMap displays C:\Program Files\QMap\Data then the quickmap folder will be C:\Program Files\QMap.
- Paste the CD-ROM files into the QuickMap folder by browsing to the QuickMap Folder in Explorer. Click on the QMap folder in the Left hand pane, then selecting Edit -> Paste from the menu. Explorer will then ask you if you want to replace existing files and folders. Answer yes to these prompts.
- The final step is to unzip the self extracting zip files by double clicking on them from explorer. The file to double click on for the given disk is as follows:
- North Island Disk 1 – Data\contour_nth_zip.exe
- North Island Disk 2 – Data\North_zip.exe
- South Island Disk 1 – Data\contour_sth_ip.exe
- South Island Disk 2 – Data\South_zip.exe
After the file(s) have been unpacked, you can delete the _zip.exe file.
If you got to this point with no errors, then congratulations! You have just completed the manual Update.
If not, then:
- Check no-one has started running quickmap while you were copying the files. If they have, restart the copy
- If the quickmap folder is a shared network drive, and you are updating the server, it may be easier to repeat the process while logged onto the server. If it is not possible to log onto the server, then check the server’s shared network drive is not read only
- Check you have administrator access to the server from your PC. Logging onto your local PC as administrator does not give you administrator access to the server.
- If the quickmap folder is local to your PC, check you are logged onto the local PC as administrator.
Please like this page:


