All map features that you can see in QuickMap have associated attribute information that can be viewed using the Information tool.
![]() To obtain information about any feature on any layer in the map, Click the Info button, and then click the item on the map.
To obtain information about any feature on any layer in the map, Click the Info button, and then click the item on the map.
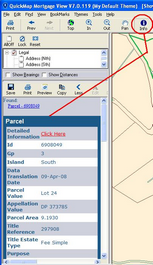
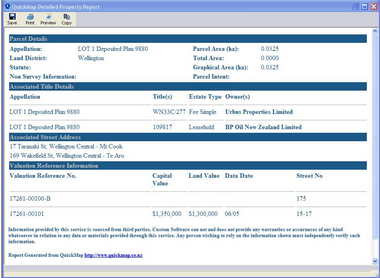
The report displays the parcel’s current title, owner, address, legal description, area, valuation reference, includes capital value, land value and street address where available and can easily be copied into a document or printed out using the Report Toolbar buttons.
To stop this Report being automatically generated when clicking the Info Tool into a parcel, select Tools-> Options-> Always Display Property Summary.
The info window will also display the parcel attributes, but also displays a Click Here" hyperlink which will bring up the property report if the automatic function is turned off..
A full description of the type of data that exists in each layer is covered under Data Characteristics section.
It is possible to deselect an object by clicking on the Deselect Icon on the Toolbar or by clicking on Deselect from Edit.
The Report window also displays hyperlinks to all other features that were found in that area. You can click on any one of these links to display the attributes, and highlight the feature on the map.
The Detailed Property Report provides links to the Comparable Sales Report and a Sales Summary (if one is available on the property).
The buttons displayed at the top of the Info Report window perform the following actions:
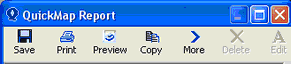
Save Save the report as HTML
Print Print the report
Print Preview Display a print preview of the report
Copy Copy the report as plain text
More Include GP, Shape and feature’s coordinate extents in the report.
Edit Edit the Features Attributes NOTE: Some layers are "Read Only"
If your mouse has a scroll button, you can increase or decrease the size of the font used for the report by holding down the CTRL key, and rolling the mouse scroll button.
Once you have selected a feature you can then change the way it looks. Refer to the section on SYMBOLOGY for instructions on how to do this.
The report will not identify features found in the New Zealand and Raster layers if the options Ignore NZ Layers and Ignore Raster Layers under Tools>Options are ticked on.
Click to find out how to create Customised Reports
Find out more about creating Reports for SalesView