
Quickmap Version 8 Survey Plans are typically installed by running QExpansionSetup.exe, or Setup.exe for Quickmap Version 7.
A silent Survey Plan install can also be achieved without running QExpansionSetup.exe or Setup.exe by updating the registry to point to the location of the Survey Plan folder.
This install method can simplify the job of installing Quickmap Survey Plans for system administrators who are tasked with installing Survey Plans for multiple copies of Quickmap on their network.
There are 2 steps required to set this up.
Step 1
Copy the contents of the Survey Plan USB Hard Disk drive provided to you by Custom Software Limited to a suitable location on your network.
Note: it is possible to leave the survey plans on the USB Hard Disk drive, but we recommend you treat this Hard Disk drive as a backup drive, to avoid having to re-purchase plans if the USB drive fails.
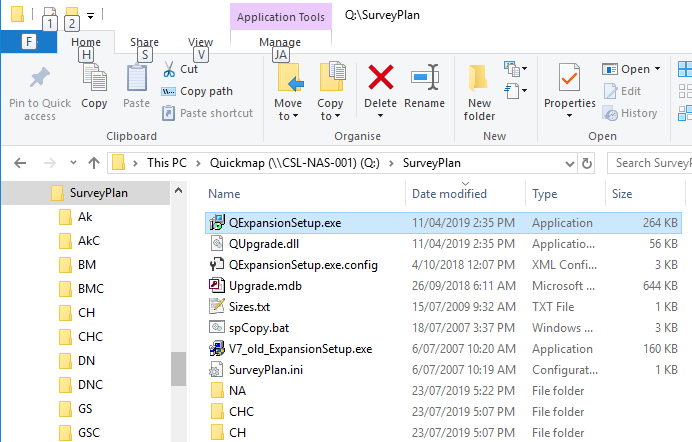
Create a network share for the Survey Plan folder so that it is visible to all Quickmap users. The survey plan folder should contain files and folders similar to below:
Step 2
Add entries to the registry for Quickmap Version 8 under HKEY_LOCAL_MACHINE\SOFTWARE\Classes\Quickmap\SurveyPlan
similar to the example below:
Windows Registry Editor Version 5.00
[HKEY_LOCAL_MACHINE\SOFTWARE\Classes\Quickmap\SurveyPlan] “auckland_index_c”=”\\\\CSL-NAS-001\\Quickmap\\SurveyPlan\\akc\\akc.mdb”“auckland_index”=”\\\\CSL-NAS-001\\Quickmap\\SurveyPlan\\ak\\ak.mdb”
“gisborne_index_c”=”\\\\CSL-NAS-001\\Quickmap\\SurveyPlan\\gsc\\gsc.mdb”
“gisborne_index”=”\\\\CSL-NAS-001\\Quickmap\\SurveyPlan\\gs\\gs.mdb”
“hamilton_index_c”=”\\\\CSL-NAS-001\\Quickmap\\SurveyPlan\\hnc\\hnc.mdb”
“hamilton_index”=”\\\\CSL-NAS-001\\Quickmap\\SurveyPlan\\hn\\hn.mdb”
“hawkes bay_index_c”=”\\\\CSL-NAS-001\\Quickmap\\SurveyPlan\\nac\\nac.mdb”
“hawkes bay_index”=”\\\\CSL-NAS-001\\Quickmap\\SurveyPlan\\na\\na.mdb”
“taranaki_index_c”=”\\\\CSL-NAS-001\\Quickmap\\SurveyPlan\\npc\\npc.mdb”
“taranaki_index”=”\\\\CSL-NAS-001\\Quickmap\\SurveyPlan\\np\\np.mdb”
“wellington_index_c”=”\\\\CSL-NAS-001\\Quickmap\\SurveyPlan\\wnc\\wnc.mdb”
“wellington_index”=”\\\\CSL-NAS-001\\Quickmap\\SurveyPlan\\wn\\wn.mdb”
“canterbury_index_c”=”\\\\CSL-NAS-001\\Quickmap\\SurveyPlan\\chc\\chc.mdb”
“canterbury_index”=”\\\\CSL-NAS-001\\Quickmap\\SurveyPlan\\ch\\ch.mdb”
“marlborough_index_c”=”\\\\CSL-NAS-001\\Quickmap\\SurveyPlan\\bmc\\bmc.mdb”
“marlborough_index”=”\\\\CSL-NAS-001\\Quickmap\\SurveyPlan\\bm\\bm.mdb”
“nelson_index_c”=”\\\\CSL-NAS-001\\Quickmap\\SurveyPlan\\nnc\\nnc.mdb”
“nelson_index”=”\\\\CSL-NAS-001\\Quickmap\\SurveyPlan\\nn\\nn.mdb”
“otago_index_c”=”\\\\CSL-NAS-001\\Quickmap\\SurveyPlan\\dnc\\dnc.mdb”
“otago_index”=”\\\\CSL-NAS-001\\Quickmap\\SurveyPlan\\dn\\dn.mdb”
“southland_index_c”=”\\\\CSL-NAS-001\\Quickmap\\SurveyPlan\\inc\\inc.mdb”
“southland_index”=”\\\\CSL-NAS-001\\Quickmap\\SurveyPlan\\in\\in.mdb”
“westland_index_c”=”\\\\CSL-NAS-001\\Quickmap\\SurveyPlan\\hkc\\hkc.mdb”
“westland_index”=”\\\\CSL-NAS-001\\Quickmap\\SurveyPlan\\hk\\hk.mdb”
In the above example the server is CSL-NAS-001, the network share is Quickmap and the Survey Plan folder is located in \\CSL-NAS-001\Quickmap\SurveyPlan.
The above example could be used by:
- Pasting the above example into a file called Plans.reg
- Find/Replace CSL-NAS-001 with the name of your server
- Find/Replace Quickmap with the name of your server network share
- Find/Replace SurveyPlan with the name of the folder containing the survey plans. An example of the folder contents is shown in step 1.
- Run plans.reg to load this into your registry.
Note: the registry HKEY_LOCAL_MACHINE\SOFTWARE\Classes\ corresponds to the HKEY_CLASSES_ROOT key, which was retained by Microsoft for compatibility with earlier versions of COM and this location is used by Quickmap Version 7.